2026/06/16(火)WSL2の中からPowershellでOSへ通知トーストを投げる

投稿日:

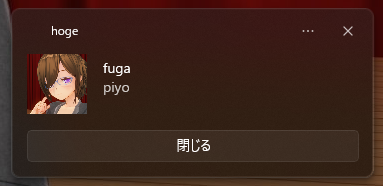
PowerShellはWSL2の中から叩けるため、WSL2の中から通知を出したいときに使える。

PowerShellなのでホスト側のWindowsからも使える。

確認環境

PowerShell 7では動かないので注意。

Env Ver
OS Windows 11 Pro 25H2 (OSビルド 26200.8655)
PowerShell 5.1.26100.8655

やり方

  1. この内容をtoast.ps1など適当な名前で保存する。文字コードはUTF-8 BOM, 改行コードはLFにしておく

    param (
        [String]$subject = "WSL Notice",
        [String]$title   = "たいとるですー",
        [String]$message = "お知らせでーす",
        [String]$icon    = "C:/env/1e1b9fdf82a6a544.png",
        [switch]$keep
    )
    
    [Windows.UI.Notifications.ToastNotificationManager, Windows.UI.Notifications, ContentType = WindowsRuntime] > $null
    $template = [Windows.UI.Notifications.ToastNotificationManager]::GetTemplateContent([Windows.UI.Notifications.ToastTemplateType]::ToastImageAndText04)
    $xml = New-Object Windows.Data.Xml.Dom.XmlDocument
    
    $xml.LoadXml($template.GetXml())
    $toastTextElements = $xml.GetElementsByTagName("text")
    $toastTextElements.Item(0).AppendChild($xml.CreateTextNode($title)) > $null
    $toastTextElements.Item(1).AppendChild($xml.CreateTextNode($message)) > $null
    $toastImageElements = $xml.GetElementsByTagName("image")
    $toastImageElements.Item(0).SetAttribute("src", $icon) > $null
    
    if ($keep) {
        $xml.DocumentElement.SetAttribute("scenario", "reminder") > $null
        $actions = $xml.CreateElement("actions")
        $action = $xml.CreateElement("action")
        $action.SetAttribute("content", "閉じる") > $null
        $action.SetAttribute("arguments", "dismiss") > $null
        $action.SetAttribute("activationType", "background") > $null
        $actions.AppendChild($action) > $null
        $xml.DocumentElement.AppendChild($actions) > $null
    }
    
    $toast = [Windows.UI.Notifications.ToastNotification]::new($xml)
    $appId = $subject
    $notifier = [Windows.UI.Notifications.ToastNotificationManager]::CreateToastNotifier($appId)
    
    $notifier.Show($toast)
    
  2. 次の書式で叩くと通知トーストが出る
    powershell.exe -File 'C:/path/to/toast.ps1' -subject hoge -title fuga -message piyo -icon C:/path/to/icon.png -keep
    

このスクリプトのオプション

オプション 役割
-subject 通知の表題。ここを変えると別の通知として扱われる
-title 通知のタイトル
-message メッセージ本文。一行のみ
-icon アイコン。Windowsホストの絶対パスで指定
-keep このフラグを立てると通知が消えなくなる

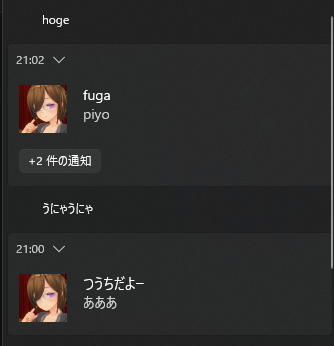
-subjectを変えると別の通知扱いになるため、通知を別々に貯めることができるようになる。

Windows側から叩く方法

powershell 'C:/path/to/toast.ps1' -subject hoge -title fuga -message piyo -icon C:/path/to/icon.png -keep

Windows側から叩く場合、-Fileは省略できる。

参考情報

あとがき

Claude Codeの確認と終了のイベントで通知が出ると便利かなと思って作ってみたが、まだ試せていない。

取りあえずWSL2の中と、Windowsホスト側から叩いたときに通知が出ることは確認している。

PowerShell 7で動かそうと思ったらエラーまみれで動かず、PowerShell 7の場合、NuGetパッケージを取得するか、DLLのパスを直に指定するか、サードパーティの通知ライブラリを使うかということで、諦めた。
2025/04/02(水)WSL2からAkamai VPNに繋がらない問題を解決した

更新日:
投稿日:

Akamai EAAからAkamai ゼロトラスト・クライアントに移行したらVPNと疎通できなくなったので、その対処をしたときのログ。

確認環境

WSL2の中から名前解決はできるがcurlやpingを叩いても疎通しない。Windows側では疎通する状態。

  • Windows 11 Pro 23H2
  • WSL 2.4.13.0
  • WSLの中はUbuntu 22.04
  • Akamai ゼロトラスト・クライアントを利用している
  • /etc/wsl.conf
    [interop]
    appendWindowsPath = false
    
  • %HOMEPATH%\.wslconfig
    [experimental]
    networkingMode=mirrored
    firewall=true
    
  • Windows側とWSL2側それぞれでpingを飛ばし、Wiresharkでパケットを観測したとき、Ethernet IIのSrcとDstのMACアドレスがWindows側は共に同値だが、WSL2側は共に異なり、いずれもWindows側の値と一致しない

解決方法

%HOMEPATH%\.wslconfignetworkingModemirroredからNATに変える。

[experimental]
networkingMode=NAT
firewall=true

2024/07/24(水)WSL2のUbuntuを20.04.6 LTSから22.04.4 LTSに上げる

更新日:
投稿日:

基本はこのコマンドを流せば行けるはず

sudo apt update
sudo apt upgrade
sudo apt full-upgrade
sudo do-release-upgrade

トラブルシュート

「There is no development version of an LTS available.」というエラーが出る

sudo do-release-upgradeの実行時に-dオプションを外す

サービスをstop出来ないみたいなエラーが出る

自動起動していない場合、PowerShellなどからWSLを殺せば解決する

wsl --shutdown

サードパーティのリポジトリ周りでこける

コケてるリポジトリを消せばよい。以下は一例

ls -la /etc/apt/sources.list.d
sudo rm -Rf /etc/apt/sources.list.d/grafana.list*

「Some third party entries in your sources.list were disabled. You can re-enable them after the upgrade with the 'software-properties' tool or your package manager.」というエラーが出る

無視してよい

2023/11/16(木)WSL2のUbuntuにRedmineを建てる

WSLのUbuntuにRedmineを建ててnginxを通して適当なバーチャルホストでアクセスするまで

確認環境

Env Ver
Ubuntu 20.04.6
Ruby 2.7.0
Redmine 5.1.0
nginx 1.18.0

インストール方法

基本は公式の通り

DB作成

CREATE DATABASE redmine CHARACTER SET utf8mb4;
CREATE USER 'redmine'@'localhost' IDENTIFIED BY 'my_password';
GRANT ALL PRIVILEGES ON redmine.* TO 'redmine'@'localhost';

インストールコマンド流す

wget https://www.redmine.org/releases/redmine-5.1.0.zip
unzip redmine-5.1.0.zip
cd redmine-5.1.0
cp config/database.yml.example config/database.yml

# DB接続は公式ドキュメントに沿って適当に設定する
# nano config/database.yml

sudo apt install -y ruby-full make gcc libmysqlclient-dev
sudo gem install bundler
bundle config set --local without 'development test'
sudo bundle install
bundle exec rake generate_secret_token
RAILS_ENV=production bundle exec rake db:migrate
RAILS_ENV=production bundle exec rake redmine:load_default_data
bundle exec rails server -e production -p 9999 -d

nginxから繋ぐ

普通にリバプロするだけ

server {
  listen       80;
  client_max_body_size 100m;
  server_name  redmine.test;
  access_log   /var/log/nginx/redmine.access.log;
  error_log    /var/log/nginx/redmine.error.log;


  location / {
    proxy_set_header Host $http_host;
    proxy_pass  http://127.0.0.1:9999;
  }

}

トラブルシューティング

An error occurred while installing redcarpet (3.6.0), and Bundler cannot continue.

makeとgccがない

sudo apt install -y make gcc

An error occurred while installing mysql2 (0.5.5), and Bundler cannot continue.

MySQLの開発ライブラリがない

sudo apt install -y libmysqlclient-dev

"/usr/bin/ruby2.7: warning: shebang line ending with \r may cause problems" redmine

無視してよい

デフォルトポートを3000から変えたい

以下のように-pで指定

bundle exec rails server -e production -p 9999 -d

デーモンにしたい

以下のように-dで指定。殺すときはpkill rubyで行ける

bundle exec rails server -e production -p 9999 -d

Windows側のスタートアップで起動したい

不明。少なくとも以下の形式だと上手く動かない。

wsl -d Ubuntu -u root -- <command>

systemdを有効化すると色々不具合があるのでinit.dで起動できれば解決できる気はするのだが、上手くいかなかった。

2023/07/12(水)即席モックサーバーの作り方

更新日:
投稿日:

Web開発をしていると取り敢えずHTTPリクエストが取れる雑なモックサーバーが欲しくなることがあるので、その作り方。

確認環境

Env Ver
OS Windows 11 Pro
WSL2 -
Distoribution Ubuntu 20.04.4 LTS
PHP 8.0.29
nginx 1.18.0

作り方

  1. Windows側の hosts127.0.0.1 mock-server.test を追加
  2. /etc/nginx/conf.d に以下の設定ファイルを置く
server {
  listen       80;
  client_max_body_size 100m;
  server_name  mock-server.test;
  access_log   /var/log/nginx/mock-server.access.log;
  error_log    /var/log/nginx/mock-server.error.log;


  location ~ ^/.*$ {
    rewrite ^/.*$ / break;
    # リクエストパスの確認用
    proxy_set_header X-Request-Path $request_uri;
    proxy_pass  http://127.0.0.1:8888;
  }
}
  1. sudo service nginx restart
  2. モックサーバーのコードを書いて適当な場所に置く
<?php

$server_json = json_encode($_SERVER);

file_put_contents('log', "$server_json\n", FILE_APPEND);
  1. php -S localhost:8888
  2. http://localhost:8888/hoge にアクセスしログファイルに追記されることを確認
  3. おわり

おまけ

$_SERVER の中身をフィルタしたい時

<?php

$ignoreKeys = [
    'DOCUMENT_ROOT',
    'REMOTE_ADDR',
    'REMOTE_PORT',
    'SERVER_SOFTWARE',
    'SERVER_PROTOCOL',
    'SERVER_NAME',
    'SERVER_PORT',
    'REQUEST_URI',
    'SCRIPT_NAME',
    'SCRIPT_FILENAME',
    'PHP_SELF',
    'HTTP_HOST',
    'HTTP_CONNECTION',
    'HTTP_UPGRADE_INSECURE_REQUESTS',
    'HTTP_USER_AGENT',
    'HTTP_ACCEPT',
    'HTTP_ACCEPT_ENCODING',
    'HTTP_ACCEPT_LANGUAGE',
    'HTTP_CACHE_CONTROL',
    'REQUEST_TIME_FLOAT',
    'REQUEST_TIME'
];

$buff = array_filter($_SERVER, function($key) use($ignoreKeys) {
    return !in_array($key, $ignoreKeys);
}, ARRAY_FILTER_USE_KEY);

$server_json = json_encode($buff);

file_put_contents('log', "$server_json\n", FILE_APPEND);