割とハマってだるいので今回はサンプル程度にPRの一覧を取得して個別にSlackに投げるものを作ってみます
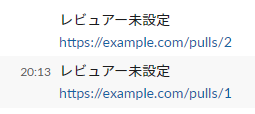
PRが2個ある場合、出力イメージはこんな感じ。2投稿に分けて投稿します
まずはSlack APIを叩くためのトークンをゲットします
Create an app からアプリを作成左のメニューからFeatures -> OAuth & Permissions
Scopesを設定
今回はBot Token Scopesをchat:writeとします
左のメニューからSettings -> Install App to Your Teamでアプリをインストール
トークンが吐き出されるのでメモする
Slack APIトークンをリポジトリのSecretsに突っ込んでおきます
名前は一旦SLACK_TOKENとします
PR一覧の取得には actions/github-script を利用します
GitHub内部の情報を抜いたり、JSで処理を組みたいときに重宝します
APIリファレンスが読みやすいので、使うのにはあんま苦労しないと思います
Slack APIを叩くのにはcurlを利用します
actions/github-scriptから叩くのは多分難しいです
これに肉付けをしていきます
name: Post to slack example
on:
  workflow_dispatch:
jobs:
  post-slack:
    runs-on: ubuntu-latest
    steps:
List pull requests にある通りに進めていきます
- uses: actions/github-script@v6
  id: set-result
  with:
    result-encoding: string
    script: |
      const { data: respPulls } = await github.rest.pulls.list({
        owner: context.repo.owner,
        repo: context.repo.repo,
      });

      console.log(respPulls);
こんなデータを取る感じで組んでいきますList pull requests を参照
type PullRequest = {
  id: number;
  reviewers: string[];
};
先ほど取得したrespPullsを上記の型付けになるように加工します
const getReviewersName = (requested_reviewers) => {
  return requested_reviewers.map((reviewers) => {
    return reviewers.login;
  });
};

const getPullRequests = (pulls) => {
  return pulls.map((pull) => {
    return {
      id: pull.number,
      reviewers: getReviewersName(pull.requested_reviewers),
    };
  });
};

const pulls = getPullRequests(respPulls);
こんなメッセージをPRの数分組んでいきます
なお実際にSlackでメンションを作る場合はGitHubのスクリーン名とSlackのユーザー IDの突き合わせ処理が別途必要です。やり方は別途後述します
@foo @bar
https://example.com/pulls/1
やっていること
上記のフォーマットでメッセージを作成
シェルスクリプトで配列として扱うためにBase64にエンコード
エンコードした文字列をスペース区切り文字列として連結
最後にWorkflowsの戻り値として設定しています
const encodedMessages = pulls.reduce((messages, pull) => {
  const reviewersBuff = pull.reviewers
    .reduce((acc, cur) => {
      return `${acc}${cur} `;
    }, '')
    .replace(/ $/, '');

  const reviewers = reviewersBuff === '' ? 'レビュアー未設定' : reviewersBuff;

  const message = `${reviewers}\\nhttps://example.com/pulls/${pull.id}`;
  const encodedMessage = Buffer.from(message).toString('Base64');

  return `${messages}${encodedMessage} `;
}, '');

return encodedMessages;
やっていること
encodedMessages=(${{steps.set-result.outputs.result}})
for message in ${encodedMessages[@]}
foreach的なやつです
改行コードがこの時点で存在すると上手くいきません
decoded_mes=$(echo ${message} | base64 -di)
postSlack "$decoded_mes"
curl叩いてるところ
-dの中をヒアドキュメントで展開するのが味噌です単純に文字列として扱うと変数展開が起きてJSONが壊れます
      - run: |
        postSlack() {
            local mes=$1

            curl -sS https://slack.com/api/chat.postMessage \
                -H 'Authorization: Bearer ${{ secrets.SLACK_TOKEN }}' \
                -H 'Content-Type: application/json; charset=UTF-8' \
                -d @- <<EOF
                {
                    token: "${{ secrets.SLACK_TOKEN }}",
                    channel: "#api-test",
                    text: "$mes"
                }
        EOF
        }

        encodedMessages=(${{steps.set-result.outputs.result}})

        for message in ${encodedMessages[@]}
        do
            decoded_mes=$(echo ${message} | base64 -di)
            postSlack "$decoded_mes"
        done
name: Post to slack example
on:
  workflow_dispatch:
jobs:
  post-slack:
    runs-on: ubuntu-latest
    steps:
      - uses: actions/github-script@v6
        id: set-result
        with:
          result-encoding: string
          script: |
            const getReviewersName = (requested_reviewers) => {
              return requested_reviewers.map((reviewers) => {
                return reviewers.login;
              });
            };

            const getPullRequests = (pulls) => {
              return pulls.map((pull) => {
                return {
                  id: pull.number,
                  reviewers: getReviewersName(pull.requested_reviewers),
                }
              });
            }

            const { data: respPulls } = await github.rest.pulls.list({
              owner: context.repo.owner,
              repo: context.repo.repo,
            });

            const pulls = getPullRequests(respPulls);

            const encodedMessages = pulls.reduce((messages, pull) => {
              const reviewersBuff = pull.reviewers.reduce((acc, cur) => {
                return `${acc}${cur} `
              }, '').replace(/ $/, '');

              const reviewers = reviewersBuff === '' ? 'レビュアー未設定' : reviewersBuff;

              const message = `${reviewers}\\nhttps://example.com/pulls/${pull.id}`;
              const encodedMessage = Buffer.from(message).toString('Base64');

              return `${messages}${encodedMessage} `
            }, '');


            return encodedMessages;
      - run: |
          postSlack() {
            local mes=$1

            curl -sS https://slack.com/api/chat.postMessage \
                -H 'Authorization: Bearer ${{ secrets.SLACK_TOKEN }}' \
                -H 'Content-Type: application/json; charset=UTF-8' \
                -d @- <<EOF
                {
                    token: "${{ secrets.SLACK_TOKEN }}",
                    channel: "#api-test",
                    text: "$mes"
                }
          EOF
          }

          encodedMessages=(${{steps.set-result.outputs.result}})

          for message in ${encodedMessages[@]}
          do
              decoded_mes=$(echo ${message} | base64 -di)
              postSlack "$decoded_mes"
          done
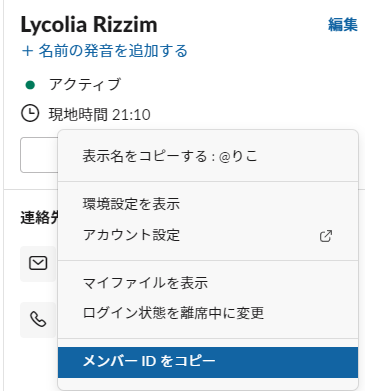
Slackへ実際にメンションを投げるのはユーザーIDを指定する必要がありますFormatting text for app surfaces
"text": "<@U024BE7LH> Hello"のようにすることでメンションを投げられます
ユーザーIDはSlackアプリから相手のプロフィールを開き、そこにあるハンバーガーメニューみたいなやつから取れます。一応取得用のAPIもあります