TypeScriptで関数を書いているときに戻り値の型を書くケースがあるが、個人的にはあれは基本書かないほうがいいと思っているので、その理由を書いていく。
コード記述が冗長になる
まず型を書くと記述が冗長になる。以下のコードを見ると戻り値型が長く読みづらく、書くのも面倒だ。まずこんな長い命名をやめたほうが…というのはあれど、現実問題として長い命名は存在するので仕方ない。
export const getCampanyAndDepartmentAndEmployeeFromPrefectureCode = (
  param: VeryveryLoooongestParamTypeNaming,
): VeryveryLoooongestReturnTypeNaming => {
  return param.db.con.execQuery(
    "SELECT * FROM foo WHERE id = :?",
    param.dbParam.foo.id,
  );
};
しかし以下であれば戻り値型がない分すっきりしていて見やすいし、書く手間も掛からない。更に型推論によって正しい型が返るので理想的だ。
export const getCampanyAndDepartmentAndEmployeeFromPrefectureCode = (
  param: VeryveryLoooongestParamTypeNaming,
) => {
  return param.db.con.execQuery(
    "SELECT * FROM foo WHERE id = :?",
    param.dbParam.foo.id,
  );
};
実装と異なる戻り値型を暗黙的に記述できる
例えば以下のように書けば戻り値の型は'foo' | 'not foo'となり、常に正しい型が返る。
export const foo = (isFoo: boolean) => {
  return isFoo ? 'foo' : 'not foo';
};
しかし以下のように戻り値の型を定義すると実装上存在しない'bar'が返る。これは実装時に無用な混乱を生む。一般的にこのようなケースは仕様削除やリファクタなどで生まれることがあると思うが、そういうメンテ漏れにもなるので書かないほうが安全だといえる。
export const foo2 = (isFoo: boolean): 'foo' | 'not foo' | 'bar' => {
  return isFoo ? 'foo' : 'not foo';
};
他にも次のケースでは戻り値がstringとなり、何が返ってくるのかが実装を見ないと解らなくなる。特に理由がないなら書かないほうがよい。
// 'foo' | 'not foo'になるはずだがstring扱いになる
export const foo3 = (isFoo: boolean): string => {
  return isFoo ? 'foo' : 'not foo';
};
型記述が混乱する
ここは基本的に前項の内容と重複する内容となる。
例えば次の二つの実装は同じだが、戻り値の型だけが異なる。こういう実装が混在すると実装の一貫性が失われ無用な混乱を生むので、指定しないほうが望ましい。
const IndexPage = (): JSX.Element => {
  return (
    <Layout title={'Hello Next.js'}>
      <>
        <h1>Hello Next.js 👋</h1>
      </>
    </Layout>
  );
};

const IndexPage2 = (): ReactElement => {
  return (
    <Layout title={'Hello Next.js'}>
      <>
        <h1>Hello Next.js 👋</h1>
      </>
    </Layout>
  );
};
書いてもよいと思うケース
例えば依存関係を持たせたい時など、インターフェースとして型を共通化したい場合は書いてもよいと思う。これはどこでそれを使うのかが自明になるからだ。改修時にも型によって関連処理が見出しやすくなるので意識しやすくなる。
export const createPostMessage = (
  channel: string,
  username: string,
  message: string,
): PostMessage => {
  return {
    channel,
    username,
    message,
  };
};

export const postMessage = async (param: PostMessage) => {
  try {
    return await fetch('https://example.com/api/postMessage', param);
  } catch (err) {
    return err;
  }
};
但しこのようなケースではUnit Testを書いて、実装された戻り値型を満たす値が返ることを確認するのが望ましい。
戻り値型を書かないことによるデメリット
TypeScriptの公式リポジトリによると、型推論の速度に悪影響を及ぼすとあるので、型推論の速度が落ちるという点だ。
もし型推論の速度が非常に遅いと感じた場合は書いてみてもよいと思うが、公式でも以下のように案内があり、和訳すると「型推論は非常に便利なので、これを普遍的に行う必要はありませんが、コードの遅いセクションを特定した場合に試してみると便利です。」とあるので、余程複雑なことをしていない限り不要だとは思うし、そんな複雑な型を返すような処理は必要がなければ書かないほうがいいだろう。
Type inference is very convenient, so there's no need to do this universally - however, it can be a useful thing to try if you've identified a slow section of your code.
少なくとも私は実務上、型推論の速度に困ったことがないのと、tscでビルドすることも稀であるため、ビルドに影響することもない。よって基本書いていない。
ローカルで動作するNode.jsのライブラリ(node_modules)欲しくないですか?欲しいですよね?という訳で作ってみました。
要件としてはTypeScriptで実装出来、Jestでテスト可能で、ESLintでLintが可能というところです。
確認環境
| Env | Ver |
|---|---|
| @swc/cli | 0.1.62 |
| @swc/core | 1.3.93 |
| @swc/jest | 0.2.29 |
| @types/jest | 29.5.5 |
| @types/node | 20.8.6 |
| @typescript-eslint/eslint-plugin | 6.7.5 |
| @typescript-eslint/parser | 6.7.5 |
| eslint | 8.51.0 |
| eslint-config-prettier | 9.0.0 |
| eslint-plugin-jest | 27.4.2 |
| jest | 29.7.0 |
| jest-watch-typeahead | 2.2.2 |
| prettier | 3.0.3 |
| ts-jest | 29.1.1 |
| typescript | 5.2.2 |
| Node.js | 20.8.0 |
| npm | 10.1.0 |
サンプル実装
https://github.com/Lycolia/ts-library-example
実装について
フォルダ構成
monorepoでmainからlibrary/singleやlibrary/multi/hoge, piyoを参照するような構成です。
root
└─packages
    ├─library // ライブラリ側
    │  └─packages
    │      ├─multi // 複数ファイルのライブラリ
    │      │  └─src
    │      │      └─utils
    │      │          ├─hoge
    │      │          └─piyo
    │      └─single // 単一ファイルのライブラリ
    │          └─src
    └─main // ライブラリを使う側
        └─src
            └─libs
実装時のポイント
これが全てというわけではないと思いますが、一旦今回作ったもののポイントを解説していきます。利用側がtscを利用しない場合、ライブラリ側と利用側で構成は別々になります。
またこの実装はエディタにVSCodeを利用し、importするパスが相対パスであることを前提に説明しています。
ライブラリ側のポイント
ビルドに関して
まずビルドに関してはtscでやります。
これはTypeScriptで開発するためにはビルド成果物として.d.tsファイルが必要になるのと、Jestを通すためにビルド成果物がCommonJS形式(以下CJS)である必要があるためです。CJSが吐けるなら何でもいいとは思いますが、.d.tsも必要になるので、tscを使うのが無難な選択肢だと思います。
テストファイルを出力したくないので、tsconfig.jsonはビルドと開発で分けます。
またtsconfig.jsonは各ワークスペースのルートに置いて置く必要があります。これはTypeScriptがtsconfig.jsonのパスを起点として動作するためです。
ビルド用の設定ポイントとしては以下の通りです。
"compilerOptions""module": "NodeNext"- これがないとパス解決が上手く行きません
"moduleResolution": "NodeNext"- これがないとパス解決が上手く行きません
"declaration": true,.d.tsの出力に使います
"outDir": "./dist",- ビルド成果物の出力先です
"exclude": ["src/**/*.spec.ts"]- ビルド時にテストファイルは不要なので無視します
"include": ["src/**/*"]- 参照するソースコードです
Jestに関して
ビルドにtscを使うため、Jestのローダーとしてもts-jestを利用します。公式ではbabelが推奨されているようですが、構成方法が不明だったので諦めました。BabelはJest公式の案内通りにやっても多分上手く行きません。
jest.config.jsには以下の設定を追加します。
preset: 'ts-jest'
開発用の設定について
開発とビルドでtsconfig.jsonを分けるので、開発用のも必要です。これはビルド用から"exclude": ["src/**/*.spec.ts"]を抜くだけです。
ライブラリを外部参照させる方法
基本的にはpackage.jsonに外部参照させるための定義を書くことによって行います。
この辺りの仕様はdocs.npmjs.comにはなく、nodejs.orgにあります。
単一ファイルの外部参照
単一ファイルを外部参照(import出来るように)するときに使う手法です。
importをimport { hoge } from '@my-lib/example'みたいな書き方をしたい時に必要になるやつです。
以下の様にビルド成果物の.jsのパスをpackage.jsonに追加してやると出来るようになります。
"main": "./dist/index.js",
以下の書き方でも同様に可能です。
"exports": {
  ".": {
    "default": "./dist/index.js"
  }
},
上記には他にtypesというフィールドがあり、本来ここに.d.tsを追加するのですが、TypeScriptが解決してくれるので、なくても動きます。一応ない場合はファイル探索を行うようなので、あった方が少しだけパフォーマンスが上がるかもしれません。
複数ファイルの外部参照
複数ファイルを外部参照(import出来るように)するときに使う手法です。
基本的に何もしなくてよいですが、import { hoge } from '@my-lib/example'みたいな書き方もしたい場合は以下の記述が必要です。
"main": "./dist/core/index.js"
ここで指定していないものはimport { hoge } from '@my-lic/example/dist/hoge'みたいにして参照します。distがダサくて嫌な場合は適当な名前に変えます。
参考までに@actions/githubはバージョン6.0.0時点でdistに相当する部分をlibにしており、import { Context } from '@actions/github/lib/context';の様にして参照するようになっています。
exportsを使ってdistを隠すことも出来るとは思うのですが面倒なので試してません。
ライブラリ側を利用する側のポイント
今回利用する側はビルドにswcを使う想定ですが、たぶんなんでも動くと思います。参考までにswc-loader + webpackでも動きました。
開発用の設定について
tsconfig.jsonに以下の設定があれば恐らく最低限大丈夫だと思います。
"compilerOptions""module": "NodeNext"- これがないとパス解決が上手く行きません
"moduleResolution": "NodeNext"- これがないとパス解決が上手く行きません
"include": ["src/**/*"]- 参照するソースコードです
ライブラリのインストール方法について
以下のように相対パスを指定するとインストールできます。
npm i ../package/library/package/single
消すときはパッケージ名を指定すれば消せます。
npm un @lycolia/library-example-single
試したけどダメだったやつら
色々してる過程で試行錯誤した名残。
ライブラリ側のJestでbabelを使おうとやったこと
以下の二通りの設定は試しましたが、どっちもダメだったので諦めました。何よりtscを使うならts-jestの方が楽なのは確定的に明らかですし…。
presets: [
  ['@babel/preset-env', {targets: {node: 'current'}}],
  '@babel/preset-typescript',
],
presets: [
  ['@babel/preset-env', {targets: {node: 'current'}, modules: 'commonjs'}],
  '@babel/preset-typescript',
],
ライブラリ側をswcでビルド
.swcrcを以下の設定にしても
"module": {
  "type": "commonjs"
},
以下の出力がされるため、jest.spyOn()が上手く動かない(getが邪魔でhelloが見れない
"use strict";
Object.defineProperty(exports, "__esModule", {
  value: true
});
Object.defineProperty(exports, "hello", {
  enumerable: true,
  get: function() {
    return hello;
  }
});
const hello = (param)=>{
  console.log(param);
};
どの道これでは.d.tsが出せないので、あんま意味ないなと…。
参考にしたもの
実装方法は@actions/githubが一番単純で参考になると思います。
- 仕様
- 実装
- Jest周り
実装はビルド成果物とビルド前のコード、package.jsonやtsconfig.json辺りがどうなっているのかを参考にしました。
ESM化が叫ばれて久しいですが、未だにJestはESMとCJSが混在したコードを処理してくれません。
Getting StartedにもSWCに対する言及がないので、きっともう忘れられているのでしょう。swc-project/jestの方も特にやる気はなさそうだし、やりたければ自分でPR書きましょうって感じだと思います。きっと。
確認環境
node_modules配下にESMで作られたモジュールが存在し、コードはTypeScript、トランスパイルにはSWCを利用する。
| Env | Ver |
|---|---|
| @swc/cli | 0.1.62 |
| @swc/core | 1.3.92 |
| @swc/jest | 0.2.29 |
| @swc/register | 0.1.10 |
| jest | 29.7.0 |
| typescript | 5.2.2 |
やったけど意味がなかったこと
package.jsonのtypeをmoduleにするjest.config.jsのtransformIgnorePatternsにESMモジュールのパスだけ除外する設定を書く- 上記に加えて
transform.jsc.pathにpkg-name: ['node_modules/pkg-name']を追記する node --experimental-vm-modules node_modules/jest/bin/jest.jsで実行する- 多少マシになったがコケるものはコケる
- ESMで書かれたモジュールを丸ごとモックする
- 一切効果なし
所感
多分Webpackでバンドルしてnode_modulesの中身も外も関係ない状態にするのが一番無難なのではないかと思いました。
Node.jsの組み込みテストランナーにすれば解決するかな?と思ったものの、こちらは現状SWCでは使えそうにないので諦めました。
参考までに以下のコマンドで走らさせられます。
node --require @swc/register --test ./src/**/*.spec.ts
取り敢えずESMに引っかったモジュールはCJS時のバージョンを維持しておくことにしましたが、このままだとSWC使えないし、なんとかなって欲しいですね。Webpack使えば解決できるのはわかるんですが、このために使いたくないので、テストを重視する場合、Vitestを持つViteが有力候補になって来そうです。
2024-02-17追記
esbuild + Node.js built-in test runnerの組み合わせであればテストはできるが肝心の実行ができず無意味だった
新しくセットアップしたTypeScriptのプロジェクトでauto-importが機能しなかったので原因を調べた。
ここ数年ちまちま起きて、そろそろイラついて我慢の限界を覚えたので…。
確認環境
| Env | Ver |
|---|---|
| VSCode | 1.83.0 |
| typescript | 4.8.4 |
再現方法
再現用のサンプルリポジトリでsrc/index.tsの下図コードに対してauto-importが発動する操作を行う。
発生条件
恐らく以下を全て満たすときにauto-import操作をしようとした時に発生する。地味にややこしい。
node_modules配下に存在し、@types/モジュールを持たないものでかつ、同一プロジェクト内でimportされておらず、package.jsonのdependenciesに書かれていない。
因みにhoge/piyo/fugaのようなモジュールはhogeだけがdependenciesにいてもauto-importが動かない。これを全部package.jsonのdependenciesに書いていくのは目眩がするので正直auto-importを諦めて自分でimportを調べて書くのが無難だと思う。
発生原因
TypeScript 4.0で実装されたSmarter Auto-Importsのせい。
node_modulesをクロールすると重すぎるので@types/だけ読み込んで、あとはpackage.jsonのdependenciesも見るようにしたよという内容らしい。
解消方法
package.jsonのdependenciesに全部のモジュールを書いていくというのが解決方法になるが、気が遠くなるので諦めた方がいい。初回だけは苦痛でもimportパスをどうにかして調べて手動で書いて、あとはauto-importされるのを期待するのが良いだろう(そんな何度もimportしないと思うが…)
取り敢えず基本npm iで入れて行き、スラッシュ区切りのやつは諦めるくらいがちょうどいいだろう。
再現用のサンプルリポジトリではpackage.jsonのdependenciesに"firebase/app": "^10.4.0"を追加することでsrc/index.tsのinitializeAppに対しauto-importが発動する様になるはずだ。
あとがき
早い話、node_modules配下にあって@types/を持たないものはTypeScriptに対応する気がないんだな程度に思っておくのが良いだろうが、TS化で@types/を廃止したライブラリがある当たり、すごく微妙な感じがある。ちょっとなんとかしてほしい。
そもそもpackage.jsonのdependenciesはnpm packageを公開する時に動作するために必要な依存関係を登録する場所で、型の補助をする場所ではなかったはずだ。
少なくともnpmjsのdevDependenciesには以下の記述がある。つまりモジュールを配布する時に動作に不要な依存関係を含まないようにするためにdevDependenciesがあるということだ。つまりdependenciesには動作に必要なものだけを入れるべきで、モジュールを配布しない場合、このフィールドは不要になるはずである。
If someone is planning on downloading and using your module in their program, then they probably don't want or need to download and build the external test or documentation framework that you use.
In this case, it's best to map these additional items in a devDependencies object.
ただTypeScriptがdependenciesに書かないとauto-importが失敗すると言っているので使うものはdependenciesに入れるというのが良いのだろう。(配布しないモジュールだとしても)
ただそれにしてもauto-importを動かすためだけに、dependenciesに同一モジュールのスラッシュ違いを大量に入れていくのはバカバカしいと思う。
  "dependencies": {
    "firebase": "^10.4.0",
    "firebase/app": "^10.4.0",
    "firebase/database": "^10.4.0",
    "firebase/analytics": "^10.4.0",
    ...
  }
かといってinitializeAppがfirebase/appにあるなんて知らんわけで、全部のパスに総当りしていくのも嫌だし、一々リファレンス漁るのも面倒だし、なんかもうちょっといい具合になって欲しい…。
SCSS Moduleを使ったNext.jsと連携させてるStorybookを6.5から7.0に上げたときの手順とトラブルシューティング
環境移行内容
moduleのバージョンをbeforeからafterにアップデート
| module | before | after |
|---|---|---|
| @storybook/addon-actions | 6.5.13 | 7.0.24 |
| @storybook/addon-essentials | 6.5.13 | 7.0.24 |
| @storybook/addon-links | 6.5.13 | 7.0.24 |
| @storybook/builder-webpack5 | 6.5.13 | 7.0.24 |
| @storybook/manager-webpack5 | 6.5.13 | 6.5.16 |
| @storybook/preset-scss | 1.0.3 | 1.0.3 |
| @storybook/react | 6.5.13 | 7.0.24 |
やったこと
- storybook周りの最新化
npm i @storybook/xxx@latest && @storybook/yyy@latest ...
トラブルシューティング
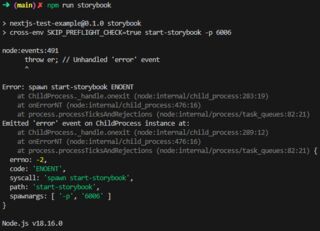
start-storybookが動かない
@storybook/cliを導入してstart-storybookをsb devに置き換え
https://github.com/storybookjs/storybook/issues/18923#issuecomment-1214280920
sb devがコケる
書かれてる通りにnpx storybook@next automigrateを流す。何か色々変更点を教えてくれるので適宜読んで対処する
終わったらnpx storybook devを流せば起動します
Unexpected usage of "storyName" in "Example". Please use "name" instead.
storyNameをnameに変える。
  export const Example: Story = {
-   storyName: 'ほげほげ',
+   name: 'ほげほげ',
  }
sass-loader が動かない
ModuleBuildError: Module build failed (from ./node_modules/sass-loader/dist/cjs.js):
SassError: expected "{".
  ╷
2 │       import API from "!../../../node_modules/style-loader/dist/runtime/injectStylesIntoStyleTag.js";
.storybook/main.jsのaddonsに'@storybook/preset-scss'がいたら消す
  module.exports = {
    stories: ['../src/**/*.stories.@(js|jsx|ts|tsx)'],
    addons: [
      '@storybook/addon-links',
      '@storybook/addon-essentials',
-     '@storybook/preset-scss',
    ],
    framework: {
      name: '@storybook/nextjs',
      options: {},
    },
    docs: {
      autodocs: true,
    },
  };
ゴミなので@storybook/preset-scssを消しておく
npm un @storybook/preset-scss


