2024/03/17(日)ローカルにadiaryの開発環境を作る
更新日:
投稿日:
投稿日:
adiaryをローカルで開発するための動かす環境構築のログ。
前提条件
- サーバー構成は前段にnginx、後段にapache2を配置し、adiaryはapache2側で動作させる
- 動作URLは
http://adiary.example.test/のようなサブドメイン付きURLとする- adiary.cgiなしでアクセス可能にする
- 開発を楽にするため、ホームディレクトリからシンボリックリンクを飛ばし、VSCodeで編集できるようにする
- nginxやapache2、perlは既にインストールされているものとする
- apache2はポート8080でListenしているものとする
確認環境
| Env | Ver |
|---|---|
| OS | Ubuntu 24.04.3 LTS |
| nginx | 1.26.1 |
| apache2 | 2.4.58 (Ubuntu) |
| adiary | 3.51a |
手順
この手順では手描きした内容をteeに書き直しており、正しくファイルが生やせるか見てないので注意。
/etc/nginx/nginx.confのhttpセクションのincludeの手前にapacheのupstream情報を追記するupstream apache { server [::1]:8080; }nginx→apache2のリバプロ設定の作成
cat <<'EOF' | sudo tee /etc/nginx/conf.d/adiary.conf
server {
  listen        [::]:80;
  client_max_body_size 100M;
  server_name  adiary.example.local;

  access_log   /var/log/nginx/adiary.example.access.log;
  error_log    /var/log/nginx/adiary.example.error.log;

  location / {
    proxy_pass http://apache/;
    proxy_set_header Host $host;
    proxy_set_header X-Real-IP $remote_addr;
    proxy_set_header X-Forwarded-Proto $scheme;
  }
}
EOF

sudo service nginx restart
Apache2でadiaryをホスティングするバーチャルホスト設定の作成
cat <<'EOF' | sudo tee /etc/apache2/sites-enabled/001-adiary.conf <VirtualHost *:8080> # internal use only domain ServerName adiary.example.local ServerAdmin webmaster@localhost DocumentRoot /var/www/html/sites/adiary # Available loglevels: trace8, ..., trace1, debug, info, notice, warn, # error, crit, alert, emerg. # It is also possible to configure the loglevel for particular # modules, e.g. #LogLevel info ssl:warn ErrorLog ${APACHE_LOG_DIR}/adiary-error.log CustomLog ${APACHE_LOG_DIR}/adiary-access.log combined # For most configuration files from conf-available/, which are # enabled or disabled at a global level, it is possible to # include a line for only one particular virtual host. For example the # following line enables the CGI configuration for this host only # after it has been globally disabled with "a2disconf". #Include conf-available/serve-cgi-bin.conf </VirtualHost> EOF/etc/apache2/apache2.confを開き<Directory /var/www/>のセクションを次のように書き換えるOptions Indexes FollowSymLinks AllowOverride All Options +ExecCGI -MultiViews +SymLinksIfOwnerMatch AddHandler cgi-script .cgi Require all grantedOptions +ExecCGI -MultiViews +SymLinksIfOwnerMatchの行は標準のserve-cgi-bin.confからパクってきたのでOptions +ExecCGIだけでも動く可能性があるAllowOverride Allはindex.htmlを残したまま表示させないために.htaccessを書くのに使う
mod_rewriteとmod_cgiを有効化し、apache2を再起動
sudo a2enmod rewrite sudo a2enmod cgi sudo service apache2 restart/var/www/html/sites/adiaryを作成し、adiaryの動作環境一式を配置- 開発し易いように権限を緩和
chmod 777 -R /var/www/html/sites/adiary sudo chown -R <your-user-name>:<your-user-name> /var/www/html/sites/adiary/ /var/www/html/sites/adiary/.htaccessにadiary用の.htaccessを書くDirectoryIndex RewriteEngine On # favicon RewriteRule ^favicon\.ico /path/to/icon.png [L] # 正規URLは通す RewriteCond %{REQUEST_FILENAME} !-f RewriteRule ^(.*) adiary.cgi/$1 [L]
Apache2でadiaryを動かす理由
結論から書くとnginx + fcgiwrapだとtry_filesの仕様的にadiaryが行うパス解析が上手く行かずに正常に動作しないためだ。
元々ModRewrite前提のCGIとして設計されており、個人的なユースケースがCGIとしての動作であることから、Apacheで動かすことにした。
adiaryの作者がcgiラッパーを作っているため、これを使えばnginxでも動かせそうだが、adiary専用のデーモンを起動するのもなんか嫌というのも理由の一つとしてある。
何より現在このブログが動作している環境が、さくらのレンタルサーバーであり、構成的にnginx + Apacheであるため、この構成を作ることに興味があったというのもあるし、現状のローカル環境ではnginxをフロントに立たせて後ろで様々なものを動かしている都合で、フロントはnginxで捌いた方が管理がしやすいのもある。
2024/03/06(水)WordPressからadiaryに変えてからのアクセス推移
投稿日:
Google Search Consoleで状況を確認してみることにする。(Google Analyticsやレンサバのログ解析も似たような結果になっている)
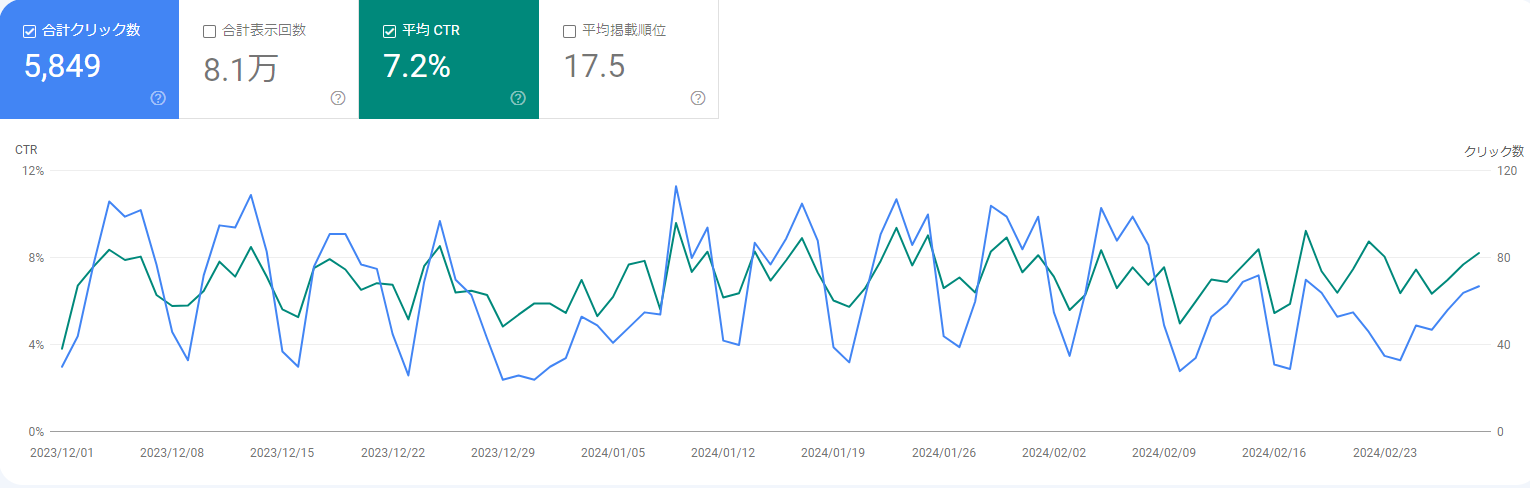
アクセス数は以前よりかなり落ちている。これはタイミングの問題かもしれない。もし、CMS変更が原因であれば、URL変更やHTMLの構造変更が影響しているのだろう。少なくともコンテンツは丸ごと移してるし、URLのリダイレクトもほとんどは機能しているはずだ。いや実際に機能しているかまで確認はしてないが…。
まぁアクセスが多くても負荷が高まってサーバーが落ちたりするので、このくらいが程よいのかもしれない。
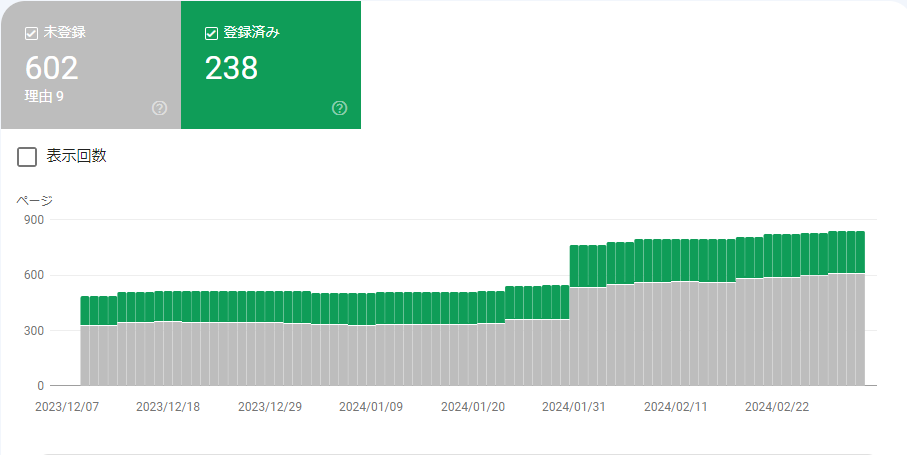
またインデックスについては未登録URLがグッと増えた。グラフを見る感じWordPressのURLがまるっと未登録になり、adiaryの分が増えた感じだろう。adiaryの方が記事URLに対してサイトマップの登録率が高いが、これはadiaryとWordPressでサイトマップのファイル構成が異なることに起因している可能性がある。例えばadiaryはサイトマップが1ファイルなのに対し、WordPressは複数ファイルであるため、Google側の解釈に差が出ているとか、そもそもXMLの内容も違うはずなので、色々影響しているのかもしれない。
インデックス状況についてはWordPressの頃は手動登録しないとインデックスされないことが少なくなかったが、adiaryでは何もせずともインデックスされるので、ここについては大きく満足している。やはりこれはWordPressよりadiaryの方が早いことに起因しているだろう。
2024/03/03(日)Windows 11でパスフレーズ付きの公開鍵認証SFTPをマウントする
更新日:
投稿日:
投稿日:
古のSFTPマウントツールが軒並み死んでいるためRcloneを使う。WindowsからLinux上に構築したストレージに繋ぐときに便利。
前提条件
- 接続先のSSH環境がある
- 接続先のSSH環境の公開鍵認証に利用する秘密鍵にパスフレーズが付いている
確認環境
| Env | Ver |
|---|---|
| OS | Windows 11 Home 25H2(26200.8039) |
| Rclone | 1.73.3 |
手順
1. 基本環境のインストール
- Rcloneをインストールする
choco install rclone - WinFspもインストールする。これがないとマウントできない
2. マウント設定の作成
- 次のコマンドで設定ウィザードを起動する
rclone config 設定はこんな感じ
# 新しい設定ファイルの作成 No remotes found, make a new one? n) New remote s) Set configuration password q) Quit config n/s/q>n # 接続名を設定する Enter name for new remote. name> hoge # 接続先のストレージ種別をSSHで設定する Option Storage. Type of storage to configure. Choose a number from below, or type in your own value. 1 / 1Fichier \ (fichier) 2 / Akamai NetStorage \ (netstorage) 3 / Alias for an existing remote \ (alias) 4 / Amazon S3 Compliant Storage Providers including AWS, Alibaba, ArvanCloud, BizflyCloud, Ceph, ChinaMobile, Cloudflare, Cubbit, DigitalOcean, Dreamhost, Exaba, FileLu, FlashBlade, GCS, Hetzner, HuaweiOBS, IBMCOS, IDrive, Intercolo, IONOS, Leviia, Liara, Linode, LyveCloud, Magalu, Mega, Minio, Netease, Outscale, OVHcloud, Petabox, Qiniu, Rabata, RackCorp, Rclone, Scaleway, SeaweedFS, Selectel, Servercore, SpectraLogic, StackPath, Storj, Synology, TencentCOS, Wasabi, Zata, Other \ (s3) 5 / Backblaze B2 \ (b2) 6 / Better checksums for other remotes \ (hasher) 7 / Box \ (box) 8 / Cache a remote \ (cache) 9 / Citrix Sharefile \ (sharefile) 10 / Cloudinary \ (cloudinary) 11 / Combine several remotes into one \ (combine) 12 / Compress a remote \ (compress) 13 / DOI datasets \ (doi) 14 / Drime \ (drime) 15 / Dropbox \ (dropbox) 16 / Encrypt/Decrypt a remote \ (crypt) 17 / Enterprise File Fabric \ (filefabric) 18 / FTP \ (ftp) 19 / FileLu Cloud Storage \ (filelu) 20 / Filen \ (filen) 21 / Files.com \ (filescom) 22 / Gofile \ (gofile) 23 / Google Cloud Storage (this is not Google Drive) \ (google cloud storage) 24 / Google Drive \ (drive) 25 / Google Photos \ (google photos) 26 / HTTP \ (http) 27 / Hadoop distributed file system \ (hdfs) 28 / HiDrive \ (hidrive) 29 / ImageKit.io \ (imagekit) 30 / In memory object storage system. \ (memory) 31 / Internet Archive \ (internetarchive) 32 / Internxt Drive \ (internxt) 33 / Jottacloud \ (jottacloud) 34 / Koofr, Digi Storage and other Koofr-compatible storage providers \ (koofr) 35 / Linkbox \ (linkbox) 36 / Local Disk \ (local) 37 / Mail.ru Cloud \ (mailru) 38 / Mega \ (mega) 39 / Microsoft Azure Blob Storage \ (azureblob) 40 / Microsoft Azure Files \ (azurefiles) 41 / Microsoft OneDrive \ (onedrive) 42 / OpenDrive \ (opendrive) 43 / OpenStack Swift (Rackspace Cloud Files, Blomp Cloud Storage, Memset Memstore, OVH) \ (swift) 44 / Oracle Cloud Infrastructure Object Storage \ (oracleobjectstorage) 45 / Pcloud \ (pcloud) 46 / PikPak \ (pikpak) 47 / Pixeldrain Filesystem \ (pixeldrain) 48 / Proton Drive \ (protondrive) 49 / Put.io \ (putio) 50 / QingCloud Object Storage \ (qingstor) 51 / Quatrix by Maytech \ (quatrix) 52 / Read archives \ (archive) 53 / SMB / CIFS \ (smb) 54 / SSH/SFTP \ (sftp) 55 / Shade FS \ (shade) 56 / Sia Decentralized Cloud \ (sia) 57 / Storj Decentralized Cloud Storage \ (storj) 58 / Sugarsync \ (sugarsync) 59 / Transparently chunk/split large files \ (chunker) 60 / Uloz.to \ (ulozto) 61 / Union merges the contents of several upstream fs \ (union) 62 / WebDAV \ (webdav) 63 / Yandex Disk \ (yandex) 64 / Zoho \ (zoho) 65 / iCloud Drive \ (iclouddrive) 66 / premiumize.me \ (premiumizeme) 67 / seafile \ (seafile) Storage> 54 # 接続先のホストを設定 Option host. SSH host to connect to. E.g. "example.com". Enter a value. host> ssh.example.com # 接続先のユーザー名を設定 Option user. SSH username. Enter a value of type string. Press Enter for the default (MYPC\myuser). user> hoge # 接続先のポートを指定、デフォルトならエンターで飛ばせると思う Option port. SSH port number. Enter a signed integer. Press Enter for the default (22). port> 12345 # 鍵認証なのでエンターで飛ばす Option pass. SSH password, leave blank to use ssh-agent. Choose an alternative below. Press Enter for the default (n). y) Yes, type in my own password g) Generate random password n) No, leave this optional password blank (default) y/g/n> # エンターで飛ばす Option key_pem. Raw PEM-encoded private key. Note that this should be on a single line with line endings replaced with '\n', eg key_pem = -----BEGIN RSA PRIVATE KEY-----\nMaMbaIXtE\n0gAMbMbaSsd\nMbaass\n-----END RSA PRIVATE KEY----- This will generate the single line correctly: awk '{printf "%s\\n", $0}' < ~/.ssh/id_rsa If specified, it will override the key_file parameter. Enter a value. Press Enter to leave empty. key_pem> # 秘密鍵のパスを指定 Option key_file. Path to PEM-encoded private key file. Leave blank or set key-use-agent to use ssh-agent. Leading `~` will be expanded in the file name as will environment variables such as `${RCLONE_CONFIG_DIR}`. Enter a value. Press Enter to leave empty. key_file> C:\path\to\hoge.sec # 秘密鍵のパスフレーズを入れる Option key_file_pass. The passphrase to decrypt the PEM-encoded private key file. Only PEM encrypted key files (old OpenSSH format) are supported. Encrypted keys in the new OpenSSH format can't be used. Choose an alternative below. Press Enter for the default (n). y) Yes, type in my own password g) Generate random password n) No, leave this optional password blank (default) y/g/n> y Enter the password: password: Confirm the password: password: # エンターで飛ばす Option pubkey. SSH public certificate for public certificate based authentication. Set this if you have a signed certificate you want to use for authentication. If specified will override pubkey_file. Enter a value. Press Enter to leave empty. pubkey> # エンターで飛ばす Option pubkey_file. Optional path to public key file. Set this if you have a signed certificate you want to use for authentication. Leading `~` will be expanded in the file name as will environment variables such as `${RCLONE_CONFIG_DIR}`. Enter a value. Press Enter to leave empty. pubkey_file> # エンターで飛ばす Option key_use_agent. When set forces the usage of the ssh-agent. When key-file is also set, the ".pub" file of the specified key-file is read and only the associated key is requested from the ssh-agent. This allows to avoid `Too many authentication failures for *username*` errors when the ssh-agent contains many keys. Enter a boolean value (true or false). Press Enter for the default (false). key_use_agent> # エンターで飛ばす Option use_insecure_cipher. Enable the use of insecure ciphers and key exchange methods. This enables the use of the following insecure ciphers and key exchange methods: - aes128-cbc - aes192-cbc - aes256-cbc - 3des-cbc - diffie-hellman-group-exchange-sha256 - diffie-hellman-group-exchange-sha1 Those algorithms are insecure and may allow plaintext data to be recovered by an attacker. This must be false if you use either ciphers or key_exchange advanced options. Choose a number from below, or type in your own boolean value (true or false). Press Enter for the default (false). 1 / Use default Cipher list. \ (false) 2 / Enables the use of the aes128-cbc cipher and diffie-hellman-group-exchange-sha256, diffie-hellman-group-exchange-sha1 key exchange. \ (true) use_insecure_cipher> # エンターで飛ばす Option disable_hashcheck. Disable the execution of SSH commands to determine if remote file hashing is available. Leave blank or set to false to enable hashing (recommended), set to true to disable hashing. Enter a boolean value (true or false). Press Enter for the default (false). disable_hashcheck> # エンターで飛ばす Option ssh. Path and arguments to external ssh binary. Normally rclone will use its internal ssh library to connect to the SFTP server. However it does not implement all possible ssh options so it may be desirable to use an external ssh binary. Rclone ignores all the internal config if you use this option and expects you to configure the ssh binary with the user/host/port and any other options you need. **Important** The ssh command must log in without asking for a password so needs to be configured with keys or certificates. Rclone will run the command supplied either with the additional arguments "-s sftp" to access the SFTP subsystem or with commands such as "md5sum /path/to/file" appended to read checksums. Any arguments with spaces in should be surrounded by "double quotes". An example setting might be: ssh -o ServerAliveInterval=20 user@example.com Note that when using an external ssh binary rclone makes a new ssh connection for every hash it calculates. Enter a value of type SpaceSepList. Press Enter to leave empty. ssh> # エンターで飛ばす Edit advanced config? y) Yes n) No (default) y/n> # 設定内容に問題ないことを確認してエンターで飛ばす # 設定を直す場合はeを選ぶと、ここまでの設定内容から修正したい箇所だけ編集できて便利 Configuration complete. Options: - type: sftp - host: ssh.example.com - user: hoge - port: 12345 - key_file: C:\path\to\hoge.sec - key_file_pass: *** ENCRYPTED *** Keep this "hoge" remote? y) Yes this is OK (default) e) Edit this remote d) Delete this remote y/e/d> # 設定の登録結果が出てくるので、特になければqで終わる Current remotes: Name Type ==== ==== hoge sftp e) Edit existing remote n) New remote d) Delete remote r) Rename remote c) Copy remote s) Set configuration password q) Quit config e/n/d/r/c/s/q> q- 設定が完了したら、以下のコマンドでマウントできる
# 例:rclone mount hoge: Z: --network-mode
# マウントパスを指定する場合はhoge:/path/toのようにすればよいと思うが試してない
rclone mount <config name>:<mount path> <drive letter>: --network-mode
設定ファイルの在り処と中身
一回作った設定ファイルは持ち運べるし、手組もできるのでフォーマットが分かっていれば一々設定ウィザードを起動する必要はない。
- 設定ファイルの在り処
%USERPROFILE%\AppData\Roaming\rclone\rclone.conf
中身のフォーマットはiniファイルで接続先がWindowsのSSHだと
shell_typeがcmd、UbuntuのSSHだとunixとなっていた[hoge] type = sftp host = ssh1.example.com user = foo port = 12121 key_file = C:\path\to\hoge.sec key_file_pass = XXXXXXXXXXXXXX shell_type = cmd [piyo] type = sftp host = ssh2.example.com user = bar port = 12122 key_file = C:\path\to\piyo.sec key_file_pass = YYYYYYYYYYYYYY shell_type = unix
トラブルシューティング
マウント時のターミナルウィンドウが邪魔
公式の解説によると、Windowsではバックグラウンドで動かすことができない
Use the --daemon flag to force background mode. On Windows you can run mount in foreground only, the flag is ignored.
どうしてもバックグラウンドで動かしたい場合はVDeskを使って適当な仮想デスクトップで起動するか、タスクトレイ系のユーティリティを使ってタスクトレイに突っ込んだりすると良さそうだ。
私は必要なときに都度起動し、仮想デスクトップを作って、そこに避難させとけば良いかな程度で今のところ考えている。この手のはネットワークが不安定な場所で動かすと色々面倒だし、使う頻度も低いので、今はそれで良いかなという感じ。