skel
- 書き替えたいコードの所在をgrepする
skel/の中に該当する行を見つけるskel.local/に該当ファイルをコピーする- 該当行を編集
- ブログの管理>ブログを再構築する
plugin
skel書き換えでうまくいかない場合
- 書き替えたいコードの所在をgrepする
plugin/配下のmodule.htmlに該当する行を見つける- 該当行を編集
- プラグイン設定>リセット>再インストール
参考
- adiary開発マニュアル
- 大まかな全体の考えを知るのに役立つが細かい情報はなく、リファレンスとしては微妙
前々からGoogle Search Consoleがエラーでクロールできないと言っていたのだが、最近サイトがダウンしている瞬間に出くわすことが増え、やっと意味が分かった。負荷によってMySQLに繋がらない状態になっているのだ(ブーストすると解除されたので、恐らく何かしら制限かかけられているのだろう)
かつてMovaleTypeからBlognに移った時はテキストDBだったので軽くなり、BlognPlusに移った時にDBがMySQLになったのでサイトが重くなったのは記憶に深いし、WordPressにしてさらに重くなったのも記憶にある。うちはさくらのレンタルサーバーで共用なのでDBが重いのだと思う。
私が遭遇するのは深夜帯が多いが、このサイトはIT企業の業務時間中にアクセスが増える傾向があるので、そういったケースでも落ちている可能性がある(ログを見ていなないので推測だが)
更に昨日WordPressのテーマをアップデートしてからYet Another Related Posts Plugin (YARPP)のカスタムテーマが意味不明なエラーを吐き、動かなくなった。
エラーの内容は以下の通りだが、意味不明である。同じ行で同じ名前の関数が再定義されているとか言われている。
Fatal error: Cannot redeclare get_post_data() (previously declared in /wp-content/themes/sango-theme-child/yarpp-template-thumbnail.php:3) in /wp-content/themes/sango-theme-child/yarpp-template-thumbnail.php on line 3
というわけで、WordPressに見切りをつけるかどうか迷っていた矢先だったので、もうWordPressを捨てようと思った。早々にMarkdown parserを書いてadiaryに乗り換えるか、或いは表示が崩れている今でも乗り換えたほうがいい気がしてきたくらいだ。
週末を目途にadiaryへの移行作業を行おうと思う。幸いなことにWordPressからadiaryにリダイレクトするための.htaccessは2024/01/23の記事分までは作ってあるので、ちょっと足せば使える。
markedをadiaryのMarkdown parserに噛まして何とかするのも試したのだが、さつき構文がHTML化されてadiaryのパーサーが上手く食べてくれず、頑張って再パースする必要がありそうなので諦めた。そもそもMarkedのパーサーも地味にバグっていたり、注釈の出力が結構不便だったり不満はあるので、自分でパーサーを書くのは全然ありだと思った。或いはEditor.mdをadiaryにねじ込んで、どうにかしてさつき構文のパーサーを組み込めれば、それも一つだと思う。(が、こいつはクライアントサイドでHTMLを捏ねるのでadiaryの仕組みと相性が悪い)
何よりパーサーを書こうとしただけでブログ記事はポコポコ湧くし、Perlは面白いしで、いろいろ発見があり、退屈な日常が無駄に忙しくなったので、これは是非ともやっていきたいし、やろうという感じで、一旦WordPressを捨てadiaryに移ろうと思う。しばらく色んな記事で表示が崩れるだろうが、現状でもサイト自体にアクセスできないことがあると考えれば大差のない話だと思うし、どうでもよくなった。
むしろ能動的にサイトをいじれるほうがいいし、ある日突然謎のアップデートでサイトが壊れるとか、そういうのは要らないので、平穏なadiaryに移れれば精神的にも安定できるかもしれない。正直WordPress 5でGutenbergが実装されたときとか、軽く絶望したわけで…。Classic Editorがなかったらやっていけないレベル。
というわけで、十数年ぶりの真っ当なサイト制作、再開していきますか~
投稿日:
確認環境
| Env | Ver |
|---|---|
| Ubuntu | 22.04.3 LTS |
やり方
# sambaの導入
sudo apt install -y samba

# sambaユーザーの作成
export $NEW_USER=hoge
sudo useradd -s /usr/bin/zsh $NEW_USER
sudo passwd $NEW_USER
sudo mkdir /home/$NEW_USER
sudo smbpasswd -a $NEW_USER

# 必要最低限の設定を突っ込んでおく
sudo cp ~/.nanorc /home/$NEW_USER
sudo cp ~/.zshrc /home/$NEW_USER
sudo cp -R ~/.zsh /home/$NEW_USER
sudo chown -R $NEW_USER:$NEW_USER

# 元の設定退避
sudo cp smb.conf smb.conf.default
# 設定追加
cat <<EOF | sudo tee -a /etc/samba/smb.conf
[$NEW_USER]
path = /home/$NEW_USER/
browsable = yes
writable = yes
guest ok = no
read only = no
create mask = 0644
directory mask = 0755

vfs objects = recycle
recycle:repository = /home/$NEW_USER/.recycle
recycle:keeptree = yes
recycle:versions = yes
recycle:touch = no
recycle:maxsize = 0
recycle:exclude_dir = .recycle
EOF
トラブルシュート
同一IPのsambaに異なるユーザーでアクセスできない
例えば\\192.168.1.10\hogeにhogeユーザー、\\192.168.1.10\piyoにpiyoユーザーでアクセスしようとすると上手くいかない。これはWindowsの資格情報がホスト単位であるためと思われる。hostsにドメインを切るなどし、ホスト部を別個にすると上手くいくようになる。
この場合、hoge.localとpiyo.localを192.168.1.10に向け、それぞれにhogeユーザーとpiyoユーザーの認証情報を持たせることで両立できる。
因みに\\192.168.1.10\hogeにhogeユーザー、\\192.168.1.10\piyoにもhogeユーザーでログインすることはできるが、基本的に権限周りで問題が起きると思う。無難なのは何かしらグループを作っておき、そのグループであれば自由に読み書きできるフォルダをsambaの共有フォルダに設定することだろう。
投稿日:
Nanoで{Ctrl}+{Q}を終了に割り当ててたらVSCodeで終了できなくなったので、それを解消した話
確認環境
| Env | Ver |
|---|---|
| Visual Studio Code | 1.85.2 |
方法
基本は"terminal.integrated.allowChords": falseで防げるが、それでも出てくるものについてはキーボードショートカットの設定から{Ctrl}+{Q}などで検索し、該当するコマンドを調べ"terminal.integrated.commandsToSkipShell": []に、頭に-を付加した、"-command"形式で記載すると出てこなくなる。
例
{
    "terminal.integrated.allowChords": false,
    "terminal.integrated.commandsToSkipShell": [
        "-workbench.action.quickOpenView",
    ],
}
投稿日:
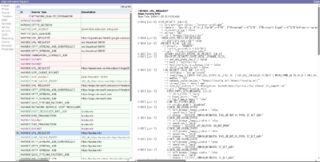
生のHTTPメッセージを見たい時に使える方法。devtoolsではフォーマットされたログしか見れないが、生のテキストを見たい時に使える。具体的には以下の画像のような奴だ。
よく忘れるのでメモとして残しておく
確認環境
| Env | Ver |
|---|---|
| Google Chrome | 120.0.6099.225 |
| Microsoft Edge | 120.0.2210.144 |
やり方
chrome://net-internals/にアクセスするとログ収集ができるので、ログを集めたらイベントビューワで見ればよい。なおイベントビューワは外部サイトなので注意。
以前はブラウザ内で完結していて、リアルタイムに見れたはずだが、何故かできなくなっていた。
Edgeの場合はedge://net-internals/でもアクセスできるが、特にこだわりがなければ汎用性の高いchrome://net-internals/でよいと思う。
