PowerShellはWSL2の中から叩けるため、WSL2の中から通知を出したいときに使える。
PowerShellなのでホスト側のWindowsからも使える。
PowerShell 7では動かないので注意。
Env
Ver
OS
Windows 11 Pro 25H2 (OSビルド 26200.8655)
PowerShell
5.1.26100.8655
この内容をtoast.ps1など適当な名前で保存する。文字コードはUTF-8 BOM, 改行コードはLFにしておく
param (
    [String]$subject = "WSL Notice",
    [String]$title   = "たいとるですー",
    [String]$message = "お知らせでーす",
    [String]$icon    = "C:/env/1e1b9fdf82a6a544.png",
    [switch]$keep
)

[Windows.UI.Notifications.ToastNotificationManager, Windows.UI.Notifications, ContentType = WindowsRuntime] > $null
$template = [Windows.UI.Notifications.ToastNotificationManager]::GetTemplateContent([Windows.UI.Notifications.ToastTemplateType]::ToastImageAndText04)
$xml = New-Object Windows.Data.Xml.Dom.XmlDocument

$xml.LoadXml($template.GetXml())
$toastTextElements = $xml.GetElementsByTagName("text")
$toastTextElements.Item(0).AppendChild($xml.CreateTextNode($title)) > $null
$toastTextElements.Item(1).AppendChild($xml.CreateTextNode($message)) > $null
$toastImageElements = $xml.GetElementsByTagName("image")
$toastImageElements.Item(0).SetAttribute("src", $icon) > $null

if ($keep) {
    $xml.DocumentElement.SetAttribute("scenario", "reminder") > $null
    $actions = $xml.CreateElement("actions")
    $action = $xml.CreateElement("action")
    $action.SetAttribute("content", "閉じる") > $null
    $action.SetAttribute("arguments", "dismiss") > $null
    $action.SetAttribute("activationType", "background") > $null
    $actions.AppendChild($action) > $null
    $xml.DocumentElement.AppendChild($actions) > $null
}

$toast = [Windows.UI.Notifications.ToastNotification]::new($xml)
$appId = $subject
$notifier = [Windows.UI.Notifications.ToastNotificationManager]::CreateToastNotifier($appId)

$notifier.Show($toast)
次の書式で叩くと通知トーストが出る
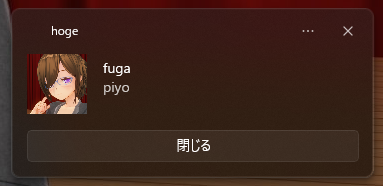
powershell.exe -File 'C:/path/to/toast.ps1' -subject hoge -title fuga -message piyo -icon C:/path/to/icon.png -keep
オプション
役割
-subject通知の表題。ここを変えると別の通知として扱われる
-title通知のタイトル
-messageメッセージ本文。一行のみ
-iconアイコン。Windowsホストの絶対パスで指定
-keepこのフラグを立てると通知が消えなくなる
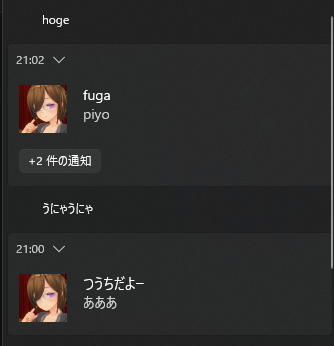
-subjectを変えると別の通知扱いになるため、通知を別々に貯めることができるようになる。
powershell 'C:/path/to/toast.ps1' -subject hoge -title fuga -message piyo -icon C:/path/to/icon.png -keep
Windows側から叩く場合、-Fileは省略できる。
Claude Codeの確認と終了のイベントで通知が出ると便利かなと思って作ってみたが、まだ試せていない。
取りあえずWSL2の中と、Windowsホスト側から叩いたときに通知が出ることは確認している。
PowerShell 7で動かそうと思ったらエラーまみれで動かず、PowerShell 7の場合、NuGetパッケージを取得するか、DLLのパスを直に指定するか、サードパーティの通知ライブラリを使うかということで、諦めた。