- 投稿日:
割とハマってだるいので今回はサンプル程度にPRの一覧を取得して個別にSlackに投げるものを作ってみます
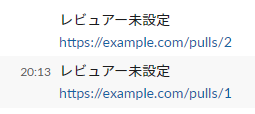
PRが2個ある場合、出力イメージはこんな感じ。2投稿に分けて投稿します
API トークンの入手
まずはSlack APIを叩くためのトークンをゲットします
- Create an appからアプリを作成
- 左のメニューからFeatures -> OAuth & Permissions
- Scopesを設定
- 今回はBot Token Scopesを
chat:writeとします
- 今回はBot Token Scopesを
- 左のメニューからSettings -> Install App to Your Teamでアプリをインストール
- トークンが吐き出されるのでメモする
GitHub Actions Workflowsの作成
SECRETの設定
- Slack APIトークンをリポジトリのSecretsに突っ込んでおきます
- 名前は一旦
SLACK_TOKENとします
Workflowsの作成
前提
- PR一覧の取得には actions/github-script を利用します
- GitHub内部の情報を抜いたり、JSで処理を組みたいときに重宝します
- APIリファレンスが読みやすいので、使うのにはあんま苦労しないと思います
- Slack APIを叩くのにはcurlを利用します
- actions/github-scriptから叩くのは多分難しいです
ベースの作成
これに肉付けをしていきます
name: Post to slack example
on:
  workflow_dispatch:
jobs:
  post-slack:
    runs-on: ubuntu-latest
    steps:
PR一覧の取得
List pull requestsにある通りに進めていきます
- uses: actions/github-script@v6
  id: set-result
  with:
    result-encoding: string
    script: |
      const { data: respPulls } = await github.rest.pulls.list({
        owner: context.repo.owner,
        repo: context.repo.repo,
      });

      console.log(respPulls);
PR一覧の加工
こんなデータを取る感じで組んでいきます
API仕様は List pull requests を参照
type PullRequest = {
  id: number;
  reviewers: string[];
};
先ほど取得したrespPullsを上記の型付けになるように加工します
const getReviewersName = (requested_reviewers) => {
  return requested_reviewers.map((reviewers) => {
    return reviewers.login;
  });
};

const getPullRequests = (pulls) => {
  return pulls.map((pull) => {
    return {
      id: pull.number,
      reviewers: getReviewersName(pull.requested_reviewers),
    };
  });
};

const pulls = getPullRequests(respPulls);
Slackに投げるメッセージの作成
こんなメッセージをPRの数分組んでいきます
なお実際にSlackでメンションを作る場合はGitHubのスクリーン名とSlackのユーザー IDの突き合わせ処理が別途必要です。やり方は別途後述します
@foo @bar
https://example.com/pulls/1
やっていること
- 上記のフォーマットでメッセージを作成
- シェルスクリプトで配列として扱うためにBase64にエンコード
- 改行コードが混ざっていると扱いづらいので
- エンコードした文字列をスペース区切り文字列として連結
AAA BBB CCC ...みたいな
- 最後にWorkflowsの戻り値として設定しています
const encodedMessages = pulls.reduce((messages, pull) => {
  const reviewersBuff = pull.reviewers
    .reduce((acc, cur) => {
      return `${acc}${cur} `;
    }, '')
    .replace(/ $/, '');

  const reviewers = reviewersBuff === '' ? 'レビュアー未設定' : reviewersBuff;

  const message = `${reviewers}\\nhttps://example.com/pulls/${pull.id}`;
  const encodedMessage = Buffer.from(message).toString('Base64');

  return `${messages}${encodedMessage} `;
}, '');

return encodedMessages;
curlを利用してSlack APIを叩く
やっていること
encodedMessages=(${{steps.set-result.outputs.result}})- 前項で作った文字列を配列として取得しています
for message in ${encodedMessages[@]}- foreach的なやつです
- 改行コードがこの時点で存在すると上手くいきません
decoded_mes=$(echo ${message} | base64 -di)- ここでBase64エンコードをデコードします
postSlack "$decoded_mes"- 別引数にならないように
""で固めます
- 別引数にならないように
- curl叩いてるところ
-dの中をヒアドキュメントで展開するのが味噌です- 単純に文字列として扱うと変数展開が起きてJSONが壊れます
      - run: |
        postSlack() {
            local mes=$1

            curl -sS https://slack.com/api/chat.postMessage \
                -H 'Authorization: Bearer ${{ secrets.SLACK_TOKEN }}' \
                -H 'Content-Type: application/json; charset=UTF-8' \
                -d @- <<EOF
                {
                    token: "${{ secrets.SLACK_TOKEN }}",
                    channel: "#api-test",
                    text: "$mes"
                }
        EOF
        }

        encodedMessages=(${{steps.set-result.outputs.result}})

        for message in ${encodedMessages[@]}
        do
            decoded_mes=$(echo ${message} | base64 -di)
            postSlack "$decoded_mes"
        done
コード全体
name: Post to slack example
on:
  workflow_dispatch:
jobs:
  post-slack:
    runs-on: ubuntu-latest
    steps:
      - uses: actions/github-script@v6
        id: set-result
        with:
          result-encoding: string
          script: |
            const getReviewersName = (requested_reviewers) => {
              return requested_reviewers.map((reviewers) => {
                return reviewers.login;
              });
            };

            const getPullRequests = (pulls) => {
              return pulls.map((pull) => {
                return {
                  id: pull.number,
                  reviewers: getReviewersName(pull.requested_reviewers),
                }
              });
            }

            const { data: respPulls } = await github.rest.pulls.list({
              owner: context.repo.owner,
              repo: context.repo.repo,
            });

            const pulls = getPullRequests(respPulls);

            const encodedMessages = pulls.reduce((messages, pull) => {
              const reviewersBuff = pull.reviewers.reduce((acc, cur) => {
                return `${acc}${cur} `
              }, '').replace(/ $/, '');

              const reviewers = reviewersBuff === '' ? 'レビュアー未設定' : reviewersBuff;

              const message = `${reviewers}\\nhttps://example.com/pulls/${pull.id}`;
              const encodedMessage = Buffer.from(message).toString('Base64');

              return `${messages}${encodedMessage} `
            }, '');


            return encodedMessages;
      - run: |
          postSlack() {
            local mes=$1

            curl -sS https://slack.com/api/chat.postMessage \
                -H 'Authorization: Bearer ${{ secrets.SLACK_TOKEN }}' \
                -H 'Content-Type: application/json; charset=UTF-8' \
                -d @- <<EOF
                {
                    token: "${{ secrets.SLACK_TOKEN }}",
                    channel: "#api-test",
                    text: "$mes"
                }
          EOF
          }

          encodedMessages=(${{steps.set-result.outputs.result}})

          for message in ${encodedMessages[@]}
          do
              decoded_mes=$(echo ${message} | base64 -di)
              postSlack "$decoded_mes"
          done
Appendix:Slackにメンションを投げる方法
Slackへ実際にメンションを投げるのはユーザーIDを指定する必要があります
参考:Formatting text for app surfaces
"text": "<@U024BE7LH> Hello"のようにすることでメンションを投げられます
ユーザーIDはSlackアプリから相手のプロフィールを開き、そこにあるハンバーガーメニューみたいなやつから取れます。一応取得用のAPIもあります
- 投稿日:
TSでprocess.exit()をラップしたカスタムexitを作った時に静的解析のフローが壊れたので、その対策。
因みにこの制御フローのことをControl Flow Analysisと呼ぶらしい。TS系の文書ではCFAと略されていることが多い模様。
問題事例
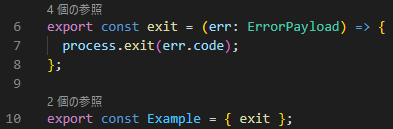
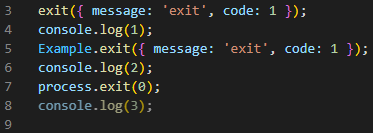
通常のprocess.exit()例の7-8行目のように次の行から先がデッドコードになって欲しいが、上手くいかないので、これを上手くいくようにする。
| カスタムexitのコード例 | 通常のprocess.exit()例 |
|---|---|
 |
 |
確認環境
| Env | Ver |
|---|---|
| TypeScript | 4.8.4 |
サンプルコード
オブジェクトでラップして、カスタムexit関数の戻り値をneverで指定してやると上手くいくようになる。
因みにこれTypeScriptの仕様らしく、上手くやる方法はあんまりなさそう。
実はアロー関数ではなくfunctionを使えば解決したりするが、それはなんか嫌なので…
example.ts
type ErrorPayload = {
  message: string;
  code: number;
};

type ExampleExit = {
  exit: (err: ErrorPayload) => never;
};

const exit = (err: ErrorPayload) => {
  process.exit(err.code);
};

export const Example: ExampleExit = { exit };
implements.ts
import { Example } from './example';

Example.exit({ message: 'exit', code: 1 });
console.log(1);
関連記事
- TypeScriptで戻り値型がneverな関数を作る
- オブジェクトに包まれていない、裸の関数に対して同様のことを行うアプローチを書いている
- 投稿日:
条件分岐でコンポーネントの出し分けをしている時に正しくコンポーネントが出ているかどうかに使えるやつ
UIロジックのリグレッションテストで使える
分岐結果の出力を見てるだけなのでテストとして壊れづらく、運用しやすいと考えている
確認環境
Next.jsで確認してるけど素のReactでも同じだと思う
| Env | Ver |
|---|---|
| @swc/core | 1.2.133 |
| @swc/jest | 0.2.17 |
| jest | 27.4.7 |
| next | 12.0.8 |
| react | 17.0.2 |
| react-dom | 17.0.2 |
| react-test-renderer | 17.0.2 |
| typescript | 4.5.4 |
テスト対象
テストのためにコンポーネントを細かくexportすると名前空間が汚染されるのが悩み…
type BaseProps = {
  id: string;
};

type SwitchExampleProps = BaseProps & {
  display: 'Foo' | 'Bar';
};

export const Foo = (props: BaseProps) => {
  return (
    <div id={props.id}>
      <p>Foo</p>
    </div>
  );
};

export const Bar = (props: BaseProps) => {
  return (
    <div id={props.id}>
      <p>Bar</p>
    </div>
  );
};

export const SwitchExample = (props: SwitchExampleProps) => {
  if (props.display === 'Foo') {
    return <Foo id={props.id} />;
  } else {
    return <Bar id={props.id} />;
  }
};
テストコード
react-testing-libraryの.toHaveAttribute()や.toHaveDisplayValue()を書き連ねるより圧倒的に楽で保守性も良いと思う
import TestRenderer from 'react-test-renderer';
import { Bar, Foo, SwitchExample } from './SwitchExample';

type TestCase = {
  name: string;
  param: Parameters<typeof SwitchExample>[0];
  actual: JSX.Element;
};

describe('SwitchExample', () => {
  const testCaseItems: TestCase[] = [
    {
      name: 'Foo',
      param: {
        id: 'hoge',
        display: 'Foo',
      },
      actual: <Foo id={'hoge'} />,
    },
    {
      name: 'Bar',
      param: {
        id: 'piyo',
        display: 'Bar',
      },
      actual: <Bar id={'piyo'} />,
    },
  ];

  testCaseItems.forEach((item) => {
    // eslint-disable-next-line jest/valid-title
    it(`switched condition ${item.name}`, () => {
      const result = TestRenderer.create(
        <SwitchExample id={item.param.id} display={item.param.display} />
      );
      const actual = TestRenderer.create(<>{item.actual}</>);

      expect(result.toJSON()).toStrictEqual(actual.toJSON());
    });
  });
});