- 投稿日:
この記事ではGitHub ActionsのCustom actionをJavaScriptで実装するJavaScript actionをTypeScriptとSWCを使って実装した方法を書いてます。
モチベーション
- GitHub ActionsのWorkflowsを共通化したい
- TypeScriptでロジックを書きたい
- SWCを使いたい(nccはtscを使うので避けたい
- github-scriptは一定以上のボリュームがあるものには向かない
- これを使いつつUTを書いたりするとなると結構面倒になると思う
今回作るもの
Custom actionのうちJavaScript actionを作成します。
実装コードはTypeScript、トランスパイラはSWC、バンドラはwebpackを利用します。
バンドラを利用するのは、node_modules/をGitで管理したくないためです。
ビルド成果物であるdist/は実行時に必要なため、Gitで管理します。
(CI上でビルドしてキャッシュさせておくことも出来ると思いますが、今回は扱いません)
確認環境
| Env | Ver |
|---|---|
| @actions/core | 1.10.0 |
| @actions/github | 5.1.1 |
| @swc/cli | 0.1.57 |
| @swc/core | 1.3.26 |
| swc-loader | 0.2.3 |
| typescript | 4.9.5 |
| webpack | 5.75.0 |
| webpack-cli | 5.0.1 |
サンプルコード
Custom Actions本体
Custom action本体のサンプルコードです。以下に一式があります。
https://github.com/Lycolia/typescript-code-examples/tree/main/swc-ts-custom-actions
ディレクトリ構成
dist/配下を叩くため、ここはGit管理に含めます。バンドルするのでnode_modules/はGit管理から外して問題ありません。
├─dist/
│ └─index.js        # Custom Actionsとして実行するファイル本体
├─node_modules/
├─src/
│ └─index.ts        # TypeScript実装
├─action.yaml       # Custom Actionsの定義
├─package-lock.json
├─package.json
├─swcrc-base.js     # SWCの設定
├─tsconfig.json     # tscの設定
└─webpack.config.js # webpackの設定
swcrc-base.js
SWCの設定例。特にJavaScript actionのための設定はなく、CLI向けのトランスパイルが出来る設定ならおk。
ファイル名は何でも大丈夫ですが、この場では.swcrcにしないことで、直接SWCで利用しないことを判りやすくするために違う名前にしています。
module.exports = {
    module: {
        type: 'commonjs',
    },
    jsc: {
        target: 'es2020',
        parser: {
            syntax: 'typescript',
            tsx: false,
            decorators: false,
            dynamicImport: false,
        },
        baseUrl: '.',
        paths: {
            'src/*': ['src/*'],
        },
    },
};
webpack.config.js
SWCを使って.tsファイルをバンドルするための設定。これがないとimportの解決ができずにコケます。
node_modules/配下をGit管理に含める場合は不要かもしれませんが、それをするのは微妙だと思います。
const path = require('path');
const swcrcBase = require(path.resolve(__dirname, 'swcrc-base'));

module.exports = {
    // エントリポイント
    entry: path.resolve(__dirname, 'src/index.ts'),
    // 出力設定
    output: {
        // クリーンアップ後に出力
        clean: true,
        // 出力ファイル名
        filename: 'index.js',
        // 出力パス
        path: path.resolve(__dirname, 'dist'),
    },
    // 設定必須なので何か指定しておく
    mode: 'production',
    // 指定してないとNode.jsのネイティブAPIが呼べない
    target: ['node'],
    module: {
        // swc-loaderの設定
        rules: [
            {
                test: /\.ts$/,
                exclude: /(node_modules)/,
                use: {
                    loader: 'swc-loader',
                    // swcrcの設定
                    options: {
                        ...swcrcBase,
                    },
                },
            },
        ],
    },
    resolve: {
        // import時のファイル拡張子を省略してる場合にパスを解決するための設定
        extensions: ['', '.ts', '.js'],
    },
};
src/index.ts
最低限これだけ確認できれば応用して実装できるだろうという程度のサンプルコード。
@actions/*系の使い方は以下のリンクから確認できます。
actions/toolkit: The GitHub ToolKit for developing GitHub Actions.
import * as core from '@actions/core';
import * as github from '@actions/github';

const githubToken = core.getInput('GITHUB_TOKEN', { required: true });
const octokit = github.getOctokit(githubToken);

console.log('octokit', octokit);
console.log('context', github.context);
core.setOutput('RESULT_MESSAGE', 'test result message');
action.yaml
実装の参考例として引数と出力を定義してます。特に不要な場合は書かなくてもいいです。
Node.jsのバージョンを詳細に指定したい場合は、composite action にすれば可能だとは思いますが、試してない。
composite actionにしてnvmか何かでインストールしてやれば恐らく可能。
構文は以下のページで確認できます。
GitHub Actions のメタデータ構文 - GitHub Docs
name: example
description: custom actions example
inputs:
  GITHUB_TOKEN:
    description: 'Repogitory GITHUB_TOKEN'
    required: true
outputs:
  RESULT_MESSAGE:
    description: 'Result message'
on:
  workflow_call:
runs:
  using: node16
  main: dist/index.js
Custom actionを使う側
Custom actionを使うWorkflowのサンプルコードです。以下にソースがあります。
https://github.com/Lycolia/custom-actions-usage-example
.github/workflows/example.yaml
usesのところにはリポジトリの組織名と、リポジトリ名、action.yamlが配置されているディレクトリまでのパスを書きます。ルートディレクトリにある場合はパスを書かなくてOK
最後に@sha-hashでコミットハッシュかタグを付けてやれば呼べるようになります。
動作確認中はハッシュが頻繁に変わるので、最新のハッシュを取得してきて設定されるようにしておくと便利かもしれません。
name: run example
on:
  workflow_dispatch:
jobs:
  example:
    runs-on: ubuntu-latest
    steps:
      - name: run custom actions
        id: test
        uses: org-name/repo-name/path/to/file@sha-hash
        with:
          # Custom action側で定義されている引数(input)の設定
          GITHUB_TOKEN: ${{ secrets.GITHUB_TOKEN }}
      - name: show custom actions output
        # Custom action側で定義されている出力(output)の取得
        run: echo ${{ steps.test.outputs.RESULT_MESSAGE }}
参考資料
- Getting Started – SWC
- swcrcの書き方やswc-loaderの使い方
- Concepts | webpack
- webpackの設定
- カスタム アクションについて - GitHub Docs
- GitHub Actions のメタデータ構文 - GitHub Docs
- プライベート リポジトリからのアクションとワークフローの共有 - GitHub Docs
- actions/toolkit: The GitHub ToolKit for developing GitHub Actions.
@actions/*系のドキュメントなど
- 投稿日:
割とハマってだるいので今回はサンプル程度にPRの一覧を取得して個別にSlackに投げるものを作ってみます
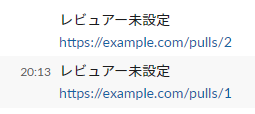
PRが2個ある場合、出力イメージはこんな感じ。2投稿に分けて投稿します
API トークンの入手
まずはSlack APIを叩くためのトークンをゲットします
- Create an appからアプリを作成
- 左のメニューからFeatures -> OAuth & Permissions
- Scopesを設定
- 今回はBot Token Scopesを
chat:writeとします
- 今回はBot Token Scopesを
- 左のメニューからSettings -> Install App to Your Teamでアプリをインストール
- トークンが吐き出されるのでメモする
GitHub Actions Workflowsの作成
SECRETの設定
- Slack APIトークンをリポジトリのSecretsに突っ込んでおきます
- 名前は一旦
SLACK_TOKENとします
Workflowsの作成
前提
- PR一覧の取得には actions/github-script を利用します
- GitHub内部の情報を抜いたり、JSで処理を組みたいときに重宝します
- APIリファレンスが読みやすいので、使うのにはあんま苦労しないと思います
- Slack APIを叩くのにはcurlを利用します
- actions/github-scriptから叩くのは多分難しいです
ベースの作成
これに肉付けをしていきます
name: Post to slack example
on:
  workflow_dispatch:
jobs:
  post-slack:
    runs-on: ubuntu-latest
    steps:
PR一覧の取得
List pull requestsにある通りに進めていきます
- uses: actions/github-script@v6
  id: set-result
  with:
    result-encoding: string
    script: |
      const { data: respPulls } = await github.rest.pulls.list({
        owner: context.repo.owner,
        repo: context.repo.repo,
      });

      console.log(respPulls);
PR一覧の加工
こんなデータを取る感じで組んでいきます
API仕様は List pull requests を参照
type PullRequest = {
  id: number;
  reviewers: string[];
};
先ほど取得したrespPullsを上記の型付けになるように加工します
const getReviewersName = (requested_reviewers) => {
  return requested_reviewers.map((reviewers) => {
    return reviewers.login;
  });
};

const getPullRequests = (pulls) => {
  return pulls.map((pull) => {
    return {
      id: pull.number,
      reviewers: getReviewersName(pull.requested_reviewers),
    };
  });
};

const pulls = getPullRequests(respPulls);
Slackに投げるメッセージの作成
こんなメッセージをPRの数分組んでいきます
なお実際にSlackでメンションを作る場合はGitHubのスクリーン名とSlackのユーザー IDの突き合わせ処理が別途必要です。やり方は別途後述します
@foo @bar
https://example.com/pulls/1
やっていること
- 上記のフォーマットでメッセージを作成
- シェルスクリプトで配列として扱うためにBase64にエンコード
- 改行コードが混ざっていると扱いづらいので
- エンコードした文字列をスペース区切り文字列として連結
AAA BBB CCC ...みたいな
- 最後にWorkflowsの戻り値として設定しています
const encodedMessages = pulls.reduce((messages, pull) => {
  const reviewersBuff = pull.reviewers
    .reduce((acc, cur) => {
      return `${acc}${cur} `;
    }, '')
    .replace(/ $/, '');

  const reviewers = reviewersBuff === '' ? 'レビュアー未設定' : reviewersBuff;

  const message = `${reviewers}\\nhttps://example.com/pulls/${pull.id}`;
  const encodedMessage = Buffer.from(message).toString('Base64');

  return `${messages}${encodedMessage} `;
}, '');

return encodedMessages;
curlを利用してSlack APIを叩く
やっていること
encodedMessages=(${{steps.set-result.outputs.result}})- 前項で作った文字列を配列として取得しています
for message in ${encodedMessages[@]}- foreach的なやつです
- 改行コードがこの時点で存在すると上手くいきません
decoded_mes=$(echo ${message} | base64 -di)- ここでBase64エンコードをデコードします
postSlack "$decoded_mes"- 別引数にならないように
""で固めます
- 別引数にならないように
- curl叩いてるところ
-dの中をヒアドキュメントで展開するのが味噌です- 単純に文字列として扱うと変数展開が起きてJSONが壊れます
      - run: |
        postSlack() {
            local mes=$1

            curl -sS https://slack.com/api/chat.postMessage \
                -H 'Authorization: Bearer ${{ secrets.SLACK_TOKEN }}' \
                -H 'Content-Type: application/json; charset=UTF-8' \
                -d @- <<EOF
                {
                    token: "${{ secrets.SLACK_TOKEN }}",
                    channel: "#api-test",
                    text: "$mes"
                }
        EOF
        }

        encodedMessages=(${{steps.set-result.outputs.result}})

        for message in ${encodedMessages[@]}
        do
            decoded_mes=$(echo ${message} | base64 -di)
            postSlack "$decoded_mes"
        done
コード全体
name: Post to slack example
on:
  workflow_dispatch:
jobs:
  post-slack:
    runs-on: ubuntu-latest
    steps:
      - uses: actions/github-script@v6
        id: set-result
        with:
          result-encoding: string
          script: |
            const getReviewersName = (requested_reviewers) => {
              return requested_reviewers.map((reviewers) => {
                return reviewers.login;
              });
            };

            const getPullRequests = (pulls) => {
              return pulls.map((pull) => {
                return {
                  id: pull.number,
                  reviewers: getReviewersName(pull.requested_reviewers),
                }
              });
            }

            const { data: respPulls } = await github.rest.pulls.list({
              owner: context.repo.owner,
              repo: context.repo.repo,
            });

            const pulls = getPullRequests(respPulls);

            const encodedMessages = pulls.reduce((messages, pull) => {
              const reviewersBuff = pull.reviewers.reduce((acc, cur) => {
                return `${acc}${cur} `
              }, '').replace(/ $/, '');

              const reviewers = reviewersBuff === '' ? 'レビュアー未設定' : reviewersBuff;

              const message = `${reviewers}\\nhttps://example.com/pulls/${pull.id}`;
              const encodedMessage = Buffer.from(message).toString('Base64');

              return `${messages}${encodedMessage} `
            }, '');


            return encodedMessages;
      - run: |
          postSlack() {
            local mes=$1

            curl -sS https://slack.com/api/chat.postMessage \
                -H 'Authorization: Bearer ${{ secrets.SLACK_TOKEN }}' \
                -H 'Content-Type: application/json; charset=UTF-8' \
                -d @- <<EOF
                {
                    token: "${{ secrets.SLACK_TOKEN }}",
                    channel: "#api-test",
                    text: "$mes"
                }
          EOF
          }

          encodedMessages=(${{steps.set-result.outputs.result}})

          for message in ${encodedMessages[@]}
          do
              decoded_mes=$(echo ${message} | base64 -di)
              postSlack "$decoded_mes"
          done
Appendix:Slackにメンションを投げる方法
Slackへ実際にメンションを投げるのはユーザーIDを指定する必要があります
参考:Formatting text for app surfaces
"text": "<@U024BE7LH> Hello"のようにすることでメンションを投げられます
ユーザーIDはSlackアプリから相手のプロフィールを開き、そこにあるハンバーガーメニューみたいなやつから取れます。一応取得用のAPIもあります
- 投稿日:
About custom actionsに書いてあることほぼそのままですが、読みづらいのでメモがてら
どうもカスタムアクションからjsを呼び出して使うの、バンドルする必要があるようでかなりだるそうなので実用性は微妙かも…
フォルダ構成
この説明ではtest.yamlをworkflowとし、index.jsを蹴るためのサンプルで説明します
└─.github/
   └─workflows/
       ├─.actions/
       │   ├─action.yaml
       │   └─index.js
       └─test.yaml
サンプルコード
test.yaml
workflow本体です
name: test
on:
  workflow_dispatch:
jobs:
  example:
    runs-on: ubuntu-latest
    steps:
      - uses: actions/checkout@v2
      - uses: ./.github/workflows/actions
        with:
          param1: 'xxx'
action.yaml
custom actionです。
ファイル名はaction.ymlないしaction.yamlである必要があります。
これ以外のファイル名の場合、実行時に次のエラーが出ます。
Can't find 'action.yml', 'action.yaml' or 'Dockerfile' under '/home/runner/work/ci-test/ci-test/.github/workflows/actions'. Did you forget to run actions/checkout before running your local action?
name: test actions
description: test
runs:
  using: 'node16'
  main: 'index.js'
index.js
console.log(123);
- 投稿日:
GitHub Actionsで前のジョブの結果を後続で利用したい時に使えるやつ
サンプルコード
- 適当な文字列を変数にセットして、各ジョブで出力する例
name: outputs sharing example
on:
  pull_request:
jobs:
  first:
    runs-on: ubuntu-latest
    outputs:
      # <out-job-name>: ${{ steps.<step-id>.outputs.<in-job-name> }}
      baz: ${{ steps.foo.outputs.bar }}
    steps:
      - uses: actions/checkout@v3
        with:
          fetch-depth: 0
      - id: foo
        # この場合、FOO-BARという値がセットされる
        run: echo "::set-output name=bar::$(echo FOO-BAR)"
      - id: test
        # steps.<step-id>.outputs.<in-job-name>
        run: echo "${{ steps.foo.outputs.bar }}"
  second:
    needs: [first]
    runs-on: ubuntu-latest
    steps:
      - id: test
        # needs.<job-id>.outputs.<out-job-name>
        run: echo "${{ needs.first.outputs.baz }}"
参考
- 投稿日:
pull_requestイベントの公式リファレンスが手薄くイベントの意味を明示してないので動きを実際に確認したものをメモ程度に。基本は意味のままだと思いますが…
opened: PRが開いたとき
reopened: PRが開き直されたとき
synchronize: PRに対してPushが走ったとき
- 公式リファレンス
特定ブランチから特定ブランチへのPRを阻止する
- サンプルで作っただけなので中身は適当
pull_requestはbranchesを先頭に書かないと、指定ブランチ以外でも走るので注意
name: testing on opend PR to main
on:
  pull_request:
    branches:
      - main
    types:
      - opened
      - reopened
      - synchronize
jobs:
  # 事前ブランチチェック
  before-check:
    runs-on: ubuntu-latest
    steps:
      - name: fail case
        if: startsWith(github.head_ref, 'test/') && github.base_ref == 'main'
        # test/* ブランチから main ブランチ宛である場合
        # exit 1で終了することで Workflow を failure 扱いにする
        # https://docs.github.com/ja/actions/creating-actions/setting-exit-codes-for-actions
        run: exit 1
        # 前の if に入らなければ、そのまま次のジョブにつながる
  after-exec:
    # 指定されたジョブの成功を要求、失敗している場合、このジョブを実行しない
    # 必然的に線形実行になる(並列では走らない)
    needs: [before-check]
    runs-on: ubuntu-latest
    steps:
      - name: TEST!
        run: echo "RUN after-exec"